Witajcie,
Zapewne zastanawialiście się nieraz, czy samodzielnie będziecie w stanie wykonać album świąteczny i czy jest to trudne oraz jak się do tego zabrać? Nasza edukatorka Ania - Cytrynowe drzewo przekona Was dziś, jak przyjemny jest to proces twórczy. Ania przygotowała dla Was kurs na świąteczny album — krok po kroku. Zatem Ania opowie Wam, jak go wykonać.
Hello Friends,
You have probably wondered whether you will be able to make a Christmas Album yourself and whether it is difficult and how to go about it? Our educator Ania - Cytrynowe drzewo will convince you today how pleasant this creative process is. Ania has prepared a course for you for a Christmas Album - step by step. So Ania will tell you how to do it.
Lista potrzebnych przedmiotów do zrobienia albumu: / List of items needed to make an album:
- papier do scrapbookingu od siostrzanej marki Lexi Design – kolekcja "Christmas Nutcracker"
/ scrapbooking paper from sister brand Lexi Design - "Christmas Nutcracker" collection
.jpg)
- beermata – karty albumu 20 cm x 20 cm z zaokrąglonymi rogami (u mnie 4 sztuki, ale możecie wykorzystać dowolną ilość)
/ beermat - album cards 20 cm x 20 cm with rounded corners (I have 4 pieces, but you can use any number)
- klej Magic / Magic glue
- tekturki: / chipboards:
→ miś w ramce / teddy bear in a frame
→ napis „Baśniowe Święta Bożego Narodzenia” / the inscription "Fairytale Christmas"
→ wózek z prezentami / gift cart
→ napis „Traktuj każdy dzień jak Święta” i „Mikołaj nadciąga” / the inscription "Treat every day like Christmas" and "Santa Claus is coming"
→ Elf z prezentem / Elf with a gift
→ śnieżynka z ornamentem / snowflake with ornament
→ napis "X-mas calories don’t count" / the inscription "X-mas calories don't count"
→ świąteczna babeczka / christmas cupcake
- nożyczki, nożyk, mata do cięcia, linijka, wskazówka i ćwiek, taśma dwustronna, 2 metalowe kółka do spięcia albumu, wstążki.
/ scissors, knife, cutting mat, ruler, pointer and stud, double-sided tape, 2 metal rings to fasten the album, ribbons.
Krok 1
W pierwszej kolejności należy okleić i przyciąć papier. Nakładam klej na beermatę, naklejam papier, odwracam i przy pomocy nożyka docinam dociskając nożyk do beermaty. Zaokrąglone rogi docinam nożyczkami. Powtarzam czynność na prawie wszystkich stronach (zostawcie jedną) (FOTO 1, 2, 3).
Step 1
First, glue and cut the paper. I put glue on the beermat, glue the paper, turn it over and use a knife to cut it by pressing the knife to the beermat. Trim the rounded corners with scissors. I repeat the action on almost all pages (leave one) (PHOTO 1, 2, 3).
Krok 2
Na 3 stronach mój album będzie miał dodatki, które zwiększą miejsce na liczbę zdjęć, dlatego też w 1 kroku zostawiliśmy nieoklejoną jedną stronę. Pierwszy dodatek to otwierane karty, które będą przytrzymywane przez wskazówkę i ćwiek. (FOTO 4). Ćwiek wpinam w wskazówkę, delikatnie nacinam papier i przekładam ćwiek na drugą stronę. Wyginam go na zewnątrz i przyklejam dwustronną taśmą. (FOTO 5). Tak to wygląda już po „właściwej stronie” (FOTO 6). Ćwiek umieszczam w górnej części papieru, aby po przyklejeniu dodatkowych kart przytrzymywał jedną z nich. Gdy ćwiek jest już na miejscu przyklejam papier do beermaty. Biorę się za przygotowanie dodatkowych kart na zdjęcia. Wycinam z papieru dwie karty o wielkości 17 cm x 11 cm (FOTO 7). Biguję je na ok. 1 cm (z tej strony gdzie mają na długość 17 cm) (FOTO 8). Tak przygotowane karty przyklejam na wcześniej przygotowaną stronę albumu za pomocą kleju (FOTO 9, 10).
Step 2
On 3 pages my album will have additions that will increase the space for the number of photos, which is why in step 1 we left one page unglued. The first addition is the opening cards that will be held by a clue and a stud. (PHOTO 4). I put the stud in the pointer, gently cut the paper and put the stud on the other side. I bend it outwards and glue it with double-sided tape. (PHOTO 5). This is how it looks on the "right side" (PHOTO 6). I place the stud at the top of the paper so that it holds one of the cards when additional cards are glued. Once the stud is in place, I glue the paper to the beermat. I am preparing additional cards for photos. I cut out two cards of 17 cm x 11 cm from paper (PHOTO 7). I crease them about 1 cm (on the side where they are 17 cm long) (PHOTO 8). I glue the cards prepared in this way to the previously prepared side of the album with glue (PHOTO 9, 10).
Krok 3
Kolejna ozdobiona karta będzie miała dodatkową kieszonkę na zdjęcia. Przycinam sobie prostokąt o długości mniej więcej 22 cm x 11 cm, biguję go na 1 – 1,2 cm z trzech stron, ucinam kwadraciki, które powstały w linii bigowania (z jednej strony dodatkowo tnę je pod skosem) i sklejam (FOTO 11), następnie przyklejam je do karty (nakładając klej tylko na te skrzydełka) (FOTO 12).
Step 3
The next decorated card will have an additional pocket for photos. I cut a rectangle about 22 cm x 11 cm long, crease it to 1 - 1.2 cm on three sides, cut the squares that were created in the crease line (on one side I also cut them diagonally) and glue them together (PHOTO 11), then I glue them to the card (applying glue only to these wings) (PHOTO 12).
Krok 4
Ostatnia dodatkowo ozdobiona karta będzie miała otwieraną w górę stronę. Przycinam papier na ok. 22 cm x 16 cm, biguję w połowie dłuższą część, tak, aby po złożeniu były dwie o rozmiarze 11 x 16 cm (FOTO 13). Odwracam złożoną kartę, przy użyciu dwustronnej taśmy przyklejam wstążkę, nakładam na całość klej i przyklejam do karty albumu. Na koniec zawiązuję wstążkę. (FOTO 14, 15).
Step 4
The last additionally decorated card will have a side that opens up. I cut the paper to approx. 22 cm x 16 cm, crease the longer part in half, so that after folding there are two 11 x 16 cm pieces (PHOTO 13). I turn the folded card over, use double-sided tape to glue the ribbon, apply glue to the whole thing and stick it to the album card. Finally, I tie a ribbon. (PHOTO 14, 15).
Krok 5
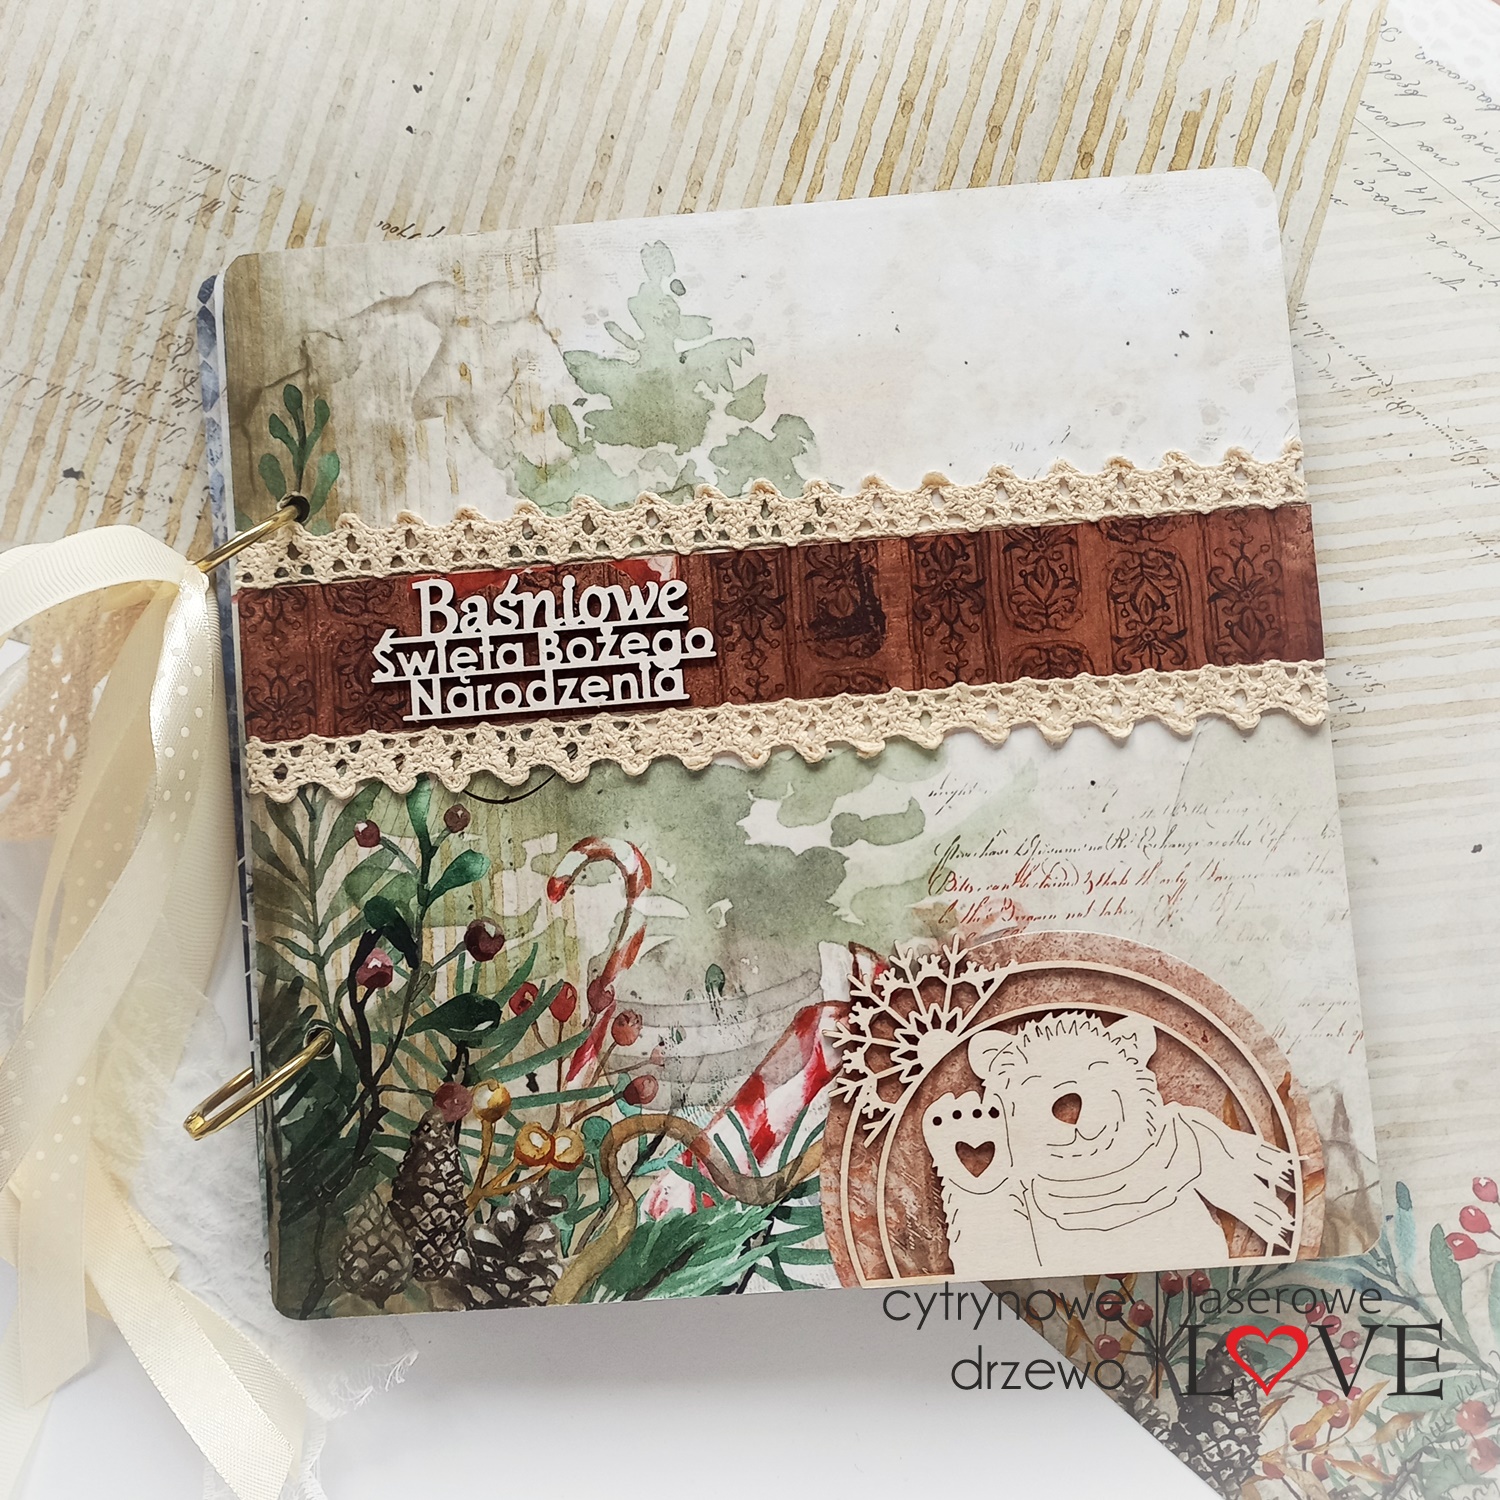
Czas na ozdobienie okładki. Wykorzystam do tego grafikę z misiem i wycięte nieco większe koło, które ucinam do wielkości tego z misiem (FOTO 16). Przyklejam grafikę na półkole, a następnie całość w prawy górny róg okładki. Wycinam także ok. 3 cm pasek, który naklejam na okładkę, a na jego górze i dole przyklejam koronkę. Na papierowym pasku, nieco z lewej strony przyklejam tekturkowy napis "Baśniowe Święta Bożego Narodzenia" (FOTO 17).
Step 5
Time to decorate the cover. For this I will use a graphic with a teddy bear and a slightly larger circle cut out, which I cut to the size of the one with a teddy bear (PHOTO 16). I glue the graphics on the semicircle, and then the whole thing in the upper right corner of the cover. I also cut out a strip of about 3 cm, which I stick to the cover, and I glue lace on its top and bottom. On the paper strip, slightly to the left, I glue the chipboard inscription "Fairy-tale Christmas" (PHOTO 17).
Krok 6
Strona 1 i 2 w albumie ozdobione będą tekturkowym wózkiem z prezentami i napisem „Traktuj każdy dzień jak Święta” (FOTO 18). Napisy naklejam na kółka, a kółka na falbanki. Następnie naklejam jedno z nich w róg strony, kolejne na środek kieszonki.
Na 3 stronie albumu przyklejam tekturkowego Elfa z prezentem (FOTO 19).
Na stronie 4, gdzie mamy otwierane na wskazówkę karty wycinam pasek (chorągiewkę), naklejam na niego napis "Mikołaj nadciąga" i przyklejam pod jedną z kart – w taki sposób, że napis będzie widoczny dopiero po otwarciu kart (FOTO 20).
Strona 5 zostaje ozdobiona tekturkową śnieżynką z ornamentem (FOTO 21).
Na stronie 6 czyli ostatniej stronie albumu przyklejam tekturki: jedna z napisem „X-mas calories don’t count”, druga to smakowita babeczka (FOTO 22).
Step 6
Pages 1 and 2 in the album will be decorated with a chipboard cart with gifts and the inscription "Treat every day like Christmas" (PHOTO 18). I stick the inscriptions on the circles, and the circles on the frills. Then I stick one of them in the corner of the page, the other in the middle of the pocket.
On the third page of the album, I glue a chipboard Elf with a gift (PHOTO 19).
On page 4, where we have cards opened at a hint, I cut out a strip (flag), stick the inscription "Santa Claus is coming" on it and glue it under one of the cards - in such a way that the inscription will be visible only after opening the cards (PHOTO 20).
Page 5 is decorated with a chipboard snowflake with an ornament (PHOTO 21).
On page 6, i.e. the last page of the album, I glue chipboards: one with the inscription "X-mas calories don't count", the other is a delicious cupcake (PHOTO 22).
Krok 7
Karty albumu łączę metalowymi kółkami o średnicy wewnętrznej 2,5 cm (FOTO 23).
Na górnym kółeczku zawiązuję kilka wstążek i koronek (FOTO 24).
Step 7
I connect the album pages with metal rings with an internal diameter of 2.5 cm (PHOTO 23).
On the upper ring I tie a few ribbons and laces (PHOTO 24).
A tak prezentuje się gotowy album (FOTO 1-9).
Jeśli zainspirujecie się kursem Ani, koniecznie pochwalcie się swoimi pracami w naszej grupie inspiracyjnej na FB - Laserowe Love'rs.
If you get inspired by Ania's course, be sure to share your work in our inspirational group on FB - Laserowe Love'rs.


.jpg)

.jpg)
.jpg)
.jpg)
.jpg)
.jpg)
.jpg)
.jpg)
.jpg)
.jpg)
.jpg)
.jpg)


.jpg)

.jpg)


.jpg)
.jpg)
.jpg)
.jpg)
.jpg)
.jpg)
.jpg)
.jpg)
.jpg)
.jpg)
.jpg)
.jpg)
.jpg)
.jpg)
.jpg)
.jpg)
.jpg)
.jpg)
.jpg)
.jpg)
.jpg)
.jpg)
.jpg)
.jpg)


